Series: One Piece
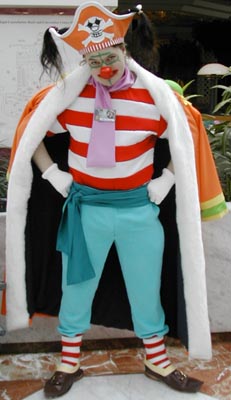
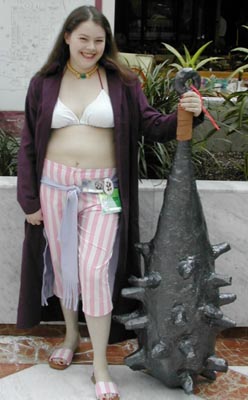
Characters: Buggy (see right) and Alvida (see below)
Made for: Alvida was made for Anime Boston 2003; Buggy was made for Anime North 2003
Worn at: Anime Boston 2003 (Alvida only), Anime North 2003 (in Masquerade), Otakon 2003, Shoujocon 2003 (hall costume competition)
Construction details (general): We piloted a number of new methods of costume design and construction here, trying to lessen our dependence on pre-existing patterns--and by "we" I mean, "Matt," as I was tied up in writing my undergraduate thesis at the time these costumes were made. We had originally hoped to have both done for Anime Boston 2003, but as Matt ended up being staff for that event (in a position which didn't really encourage costume wearing), it seemed like there was no real reason to complete Buggy in time for this event. At Anime North 2003, we competed for our first time as journeymen--and discovered that the competition is a lot tougher at that level than it was at novice.
Construction details (Buggy): Some challenges here were finding a striped fabric to use for the shirt (which didn't happen; we ended up constructing our own striped fabric), making the bicorne hat, and delving into the exciting world of cobblery to make the shoes.
Hat: The hat is basically a soft cloche out of which two sections are missing, so that the hair or wig can escape and flow over the top. The cloche is then surrounded with appropriately-shaped sections of heavy buckram, forming a bicorne shape. The skull and crossbones design was appliqued on, and puff fabric paint was used to add the details of the eye sockets and teeth. The bottom edge of the bicorne was lined with red-and-white striped fabric, and the top edges were bound with white double fold bias tape. If necessary, the hair or wig escaping from the top of the inner part of the hat can be pinned to the corns of the hat for stability.
Coat: In the grand fashion of One Piece captains, evil or otherwise, Buggy never actually puts his arms in the sleeves of his coat. Still, the coat has functional arms nonetheless, being made from a bathrobe pattern. The cuffs are appliqued with the appropriate yellow and green designs (the green fabric is actually a green-sequined fabric turned inside out); the epaulets are made from (ironically) miniature straw hats covered and fabric and decored with yellow fringe. Lots of fake fur also died for the trim of this coat.
Shirt/Neckcloth: After much searching, we didn't have any luck finding a fabric with wide enough red and white stripes to work for this shirt. So, we did the next best thing--we sewed together strips of red and white fabric to make coherent square of striped fabric, and then constructed a shirt from that square, using a modification of the pattern used for the Zoro shirt.
Unfortunately, much as one might predict, horizontal stripes do nothing for Matt's figure ^_^ It's also a real chore to get on and off, and scratchy (from the seams of the red and white stripes), and hot (both fabric are polyester and thus don't breathe), and so it is likely to be remade.
There are actually two neckcloths: one made of cotton and one made of a shiny polyester. We were trying to achieve the optimum drape with these, but it's questionable which one attained it better. Usually Matt can be seen wearing the shiny polyester one (as in the picture above).
Pants/Sash: A basic men's pants pattern was used to create these pants. The fabric is semi-plush blue synthetic fabric. Unfortunately, Matt had to go and ruin these pants with his ghetto booty--at Otakon, the first pair of these pants split down the crotch seam in the middle of the day. Needless to say, we were not pleased. The pants were remade in a larger size, and seem to fit fine, now.
The sash was made in much the same way as the sashes on the FY costumes.
Shoes/Socks: By the power of some vinyl, shoe goo, and a book on cobblery, Matt created these shoes all by himself. He bought professional soles and cut them down to the shape of his own feet, and added heels designed especially for use in cobblery. He then created the tops of the shoes using brown vinyl (leather would have been ideal, but was difficult to find), and glued the tops on with professional shoe adhesive. Buckles (cannibalized from two belts) and yellow trim were added to complete the shoes.
The socks were bought from an online sock store, which keeps sending us frightening advertisements with hairy-chested bodybuilders holding onto decrepit grandmothers.
Gloves: Unlike with the Hellsing costumes, we actually succeeded this time in making our own gloves, sans pattern. Matt first traced his hand onto a heavy-weight, stretchy white fabric, leaving enough fabric for a seam allowance. The gloves were then sewn together. At the opening of the glove, the fabric was "hemmed" as one would do in making an elastic waistband (i.e., a slit was left open in the hem), and batting was inserted to give the gloves their puffy trim effect.
Nose/Clown Makeup: In the interest of having a high quality clown nose, we purchased one from a clown supply company, ClownAntics.com. It's made from heavy-duty latex, and is applied with an adhesive to one's own nose.
Of course, before putting on the nose, it's important to apply the rest of the clown makeup. For this, we turned to a children's Halloween makeup kit, which gave us all the colors we really needed to paint Matt's lips and add Buggy's signature green/blue anchor to his face.
Unfinished details: We noticed, much after the fact, that Buggy actually has two buckles on each shoe. Since we originally intended to make the shoes in leather, it might be ideal to remake them.

Construction details (Alvida): With the Alvida costume, we had our first foray into working with materials that required a gas mask, and I got to have my lower body wrapped completely in duct tape. Now, who says cosplay isn't fun?
Coat: Alvida's coat was made from a woman's jacket pattern, which was lengthened into a coat pattern. One detail which is (unfortunately) not visible in this picture is the fact that like Alvida's sleeves in the anime, when rolled up, they are lined with the same pink and white fabric as the pants. We accomplished this by making most of the lining out of normal black lining fabric, except for the lower part of the arms, which was made from the pink and white striped fabric. I was exceptionally proud of this detail, which is why I'm so angry that I FORGOT to roll up my sleeves in this picture.
Unlike with the Hellsing costumes, we hemmed the lining to the outer fabric by hand, which gives this coat a MUCH better drape than those costumes had. The only detail I dislike on this is the collar, which we attempted (unsuccessfully) to improvise just by folding down the existing collar and sewing the corners down. We should have added on a collar of our own design, instead.
Top: .... was a bikini top, made from a bikini pattern. White swimsuit fabric was used, and maroon double-fold bias tape was doubled up and sewn together to make the strings. The biggest problem with the top is that it's, uh, a little revealing, which I usually remedy by cutting strips from those stick-on bras from Frederick's and placing them strategically.
Pants/Sash: Since we sincerely doubted the ability of any pattern for Capri pants to adequately hug my curves, we decided on a radical way of making the pattern for these pants--we wrapped me in duct tape. Of course, we had entirely too much fun showing off to my housemates before we cut the duct tape off where seams would eventually be, and flattened it to make pattern pieces. This method of making fitted pants worked exceptionally well, and I wouldn't hesitate to try it again.
The sash was basically an original design. In the anime, what Alvida seems to be wearing around her waist is a tied-off shirt. We improvised the square-ish design of that with lavender cotton fabric.
Shoes: We purchased a pair of sandals and hot-glued the pink and white fabric to them. Unfortunately, the uneven lumps of dried glue do terrible things to my feet ::winces::
Jewelry: In addition to the necklace visible in this picture, there is a matching bracelet hidden under the sleeve of the coat (which, once again, should be ROLLED UP). These two pieces of jewelry were constructed largely from wooden beads (or fang shapes) painted with yellow acrylic paint. The green jewel in the center of the necklace was a fake jewel with a crimp bead super-glued to the back to make a pendant of a sort.
Club: Ahhhh, the club. I'll let Matt talk about this one in more detail.
Unfinished details: Alvida should also have a shawl (pink with red hearts, with red fringe), which is in the process of being made. I had an artistic friend of mine make a stencil of the heart pattern, and then used I acrylic paint mixed with fabric medium to paint the hearts on. The fringe was supposed to be applied before I wore this costume at Anime Boston 2003; however, if I'm lucky, I'll actually remember to apply it before Anime Boston 2004--not that it will matter, since I'm staff.
This costume also should incorporate a white cowboy-ish hat with a red feather. A hat was attempted--rather than trying to form wool felt to a head block (the usual method of making these kinds of hats), which requires an expensive, custom-fitted wooden head block and equally expensive steam-producing equipment, we tried to be creative with buckram and wire. Although not completely successful (the hat ended up too small), it has given us a great start in creating these kinds of hats, and we plan to remake this hat, perhaps after we finish our current costuming project.