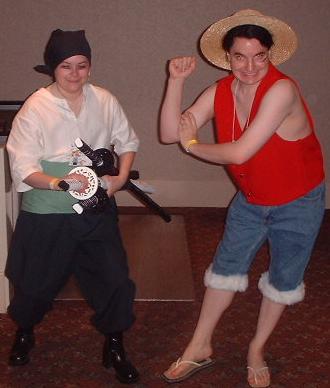
Characters: Roronoa Zoro (left) and Monkey D. Luffy (right)
Series: One Piece
Made for: Shoujocon 2002
Worn at: Shoujocon 2002 (hall costume competition), AnimeNorth 2003, AnimeBoston 2003, and beyond
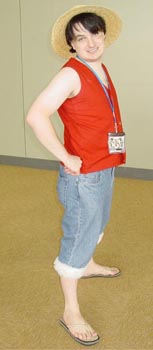
Photo credits: Group photo at right courtesy of DJ Ranma S. Luffy photo at bottom courtesy of icosplay.com.
Construction details (general): These costumes were nice and simple, after the Hellsing costumes.... although they seem to be constantly evolving. No costumes had more than a few parts, and, aside from trying to find the perfect fabric for the Zoro pants, these costumes were made largely from fabric from the discount rack, and dollar store and Goodwill finds.
Construction details (Zoro): Zoro's costume had five major parts: shirt, pants, "cummerbund", and bandanna. The hardest part of any of this was that we needed to find a shade of green that was dark enough to look black in certain lights, as Zoro's pants seem to range in color from green to black, depending on picture. We would need this same fabric for the bandanna, as well.
Pants: We went through three different fabrics for the Zoro pants. The first one was a pure black cotton/poly blend from the bargain bin, which we hoped to add a green "tinge" to with green RIT dye. No dice. Black doesn't take color very well, after all. We bought a dark green fabric to use instead, but, just before we were about to construct the pants, we found a perfect shade of green/black made in a wool/poly blend, from Fabric Place in Woburn, MA (a truly wonderful place to shop for fabric). In this way, the pants, oddly enough, ended up being the most expensive part of the costume, simply in the search for the perfect fabric.
The pattern we used was a pretty generic, baggy pants pattern, which we pulled from the Asian cheongsam-inspired Simplicity pattern that we used for the FY costumes. The pants were super-easy to make, but the only downfall was that wool/poly blends are hideously scratchy, and I had to wear hose underneath the pants in order for them to be anything like comfortable.
Shirt: Once again, we needed a white that wasn't see-through, but we found a perfect heavy white cotton that worked. We used a McCalls (I think) pattern for fleece shirt, which had a slit at the neck, where we placed some non-functional white buttons. Matt made this one, and it turned out exceptionally well. And it's so soft!

Cummerbund: I kept joking about this cummerbund; first, that my mother would kill me for using premium quilting cottons (light green Kona cottons, to be precise) for making costumes; secondly, that in the process of making it, it looked like a dishtowel.
Basically, we patterned this one ourselves, by measuring my waist, and making a sash that was about that length, and attached with Velcro at the ends. We did decorative topstitching in lines every inch or so apart (okay, that's a nice way of saying we ran the sewing machines over it at every inch marking), which took forever, and added to the dishtowel look. With the seam allowances, and the Velcro overlap, it ended up being a little tight (damn those feminine hips of mine!), which wasn't a major problem, except that at the con, the Velcro kept coming undone and needed to be adjusted a lot.
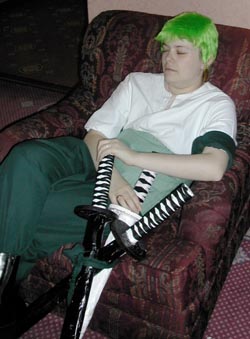
Swords: Ah, the swords. See, we needed something that was definitively not a weapon, but still looked good. Unfortunately, this stumped us right up until the week before Shoujocon. Finally, I remembered my friend Jess' trick of making casts of his arm, by wrapping clear packing tape around his arm, sticky side out, until he got a form, then wrapping, sticky side in, to complete the shape. Since we had an actual katana to use as a form, we figured we could at least duplicate the katana's sheath, which would be close enough.
Here are the steps we followed for the Perfect Fake Sword (times 3):
- Sheath construction - we made a tape mold of the sheath of the sword, making sure it was thick enough that, when we removed it from the sword, it wouldn't bend. Then, we covered the sheaths with papier mache in order to have a paintable surface (we used wallpaper paste as our paste, since it has a fungicide in it). We allowed that to dry, and then, spray painted two sheathes black, and one white, a la Zoro. As a final step, the tape was pulled out of the papier mache casing, in order to accomodate the blade.
- Blade construction - We made a tape mold of the blade, again, making sure it was thick enough to stand on its own. To give some weight to the blades, we filled them with foam insulation. Beware! This stuff expands a lot, and we were a little too gung-ho with it. A little goes a long way. The blade was then wrapped in aluminum tape, and hot glued into the crossguard.
- Crossguard - we found some coasters at the dollar store that were the appropriate shape, and painted them black and white. We also cut holes in the center to accomodate the blade and the hilt.
- Hilt - Matt used some thick wooden dowels that he had lying around the house, cut in the right shape to accomodate the crossguard. This was hot glued into the crossguard, and then, when dry, it was painted black or white and wrapped in black or white shoelaces.
'Twas quite a task, but the end result was quite nice. Maybe some varnish on the sheath is warranted, however. And they were heavy to carry around, take my word for it. More pictures of the swords will be available soon.
Bandanna: Was made from the same fabric as the pants, which might have been a mistake, because it was a bit too thick to be worn a bandanna, and I kept having to adjust it. Now that I have the green wig, I tend to wear it around my arm, as pictured.
Wig: After a sub-par wig website utterly failed to ship me this wig in time for Shoujocon 2002, I finally found it at www.funwigs.com. Unfortunately, it's a lot more neon green than I like. Still, it gives a general impression, and can easily enough be covered with the bandanna.
I get asked a lot how I fit all my hair under that wig (I've also had people assume that the wig was my hair, which was the ultimate compliment in wig-wearing). The trick I use is to wet my hair, tie it in a couple of braids, and pin these braids flat to my hair, facing forwards, with bobby pins. I then cover my head with a wig cap (i.e., a pair of pantyhose from which I've cut the legs and tied in a knot at the top). If I feel like being extreme, I then hand my electric razor to Matt and let him shave off all the bits that still stick out (this is what I did for Anime Boston 2003). I don't condone this method, though, as it really did terrible things to my hair--and even now, almost a year later, it's still growing back!
Other details: We bought some appropriate earrings and turned two out of three of them into clip-ons. (Wish I still had three holes in each ear). We used black eyeliner under my eyes to get that "battle-mode Zoro" look. We used the same boots as the Hotohori costume for shoes. And of course, we used Ace bandages once again to get rid of my boobs.

Construction details (Luffy): This was, of course, the simplest costume, since parts of it were found.
Vest/shirt: We used a basic Simplicity (or some such) vest pattern for this one. The pattern constructed the vest in a rather annoying way, and so, instead of doing all the slipstitching it wanted, we finished some raw edges with double-fold bias tape. In time, this vest was remade out of a softer fabric, and in a better fitting way. This is the vest that Matt wears in the individual picture.
The fabric was actually originally intended to be part of a red Shinto priestess-style hakama, back when I was planning to cosplay as Asahina from Haunted Junction. Thankfully, hakama, even half-finished ones, are so massively big that it provided enough fabric for this simple pattern.
Pants: Thankfully, Luffy's pants are no more complicated than a pair of cutoff jeans. Appropriate jeans were found for a couple of dollars at a local Goodwill, and turned into Luffy's signature cutoffs.
We spent a while debating whether Luffy's pants were a) edged in fur, or b) simply rolled up at the cuffs. Fur seemed more dramatic and visible, so we purchased some fake fur and trimmed the cuffs with that.
Hat: The straw hat was purchased at Wal-Mart, and we used scraps of the shirt fabric to make a ribbon.
Other details: The flip-flops were purchased for use with this costume. We used black eye pencil to draw Luffy's characteristic scar. Matt dyed his hair black for this costume, expecting it would come in useful when he cosplayed Alucard later on in the day.
Shu Shu! (no picture available yet): We were lucky enough, when we were browsing the Goodwill, to find a stuffed dog that looked exactly like Shu Shu, the dog that guards the pet food store in One Piece's Buggy story arc. Unfortunately, at one point he got left in the dealer's room at Shoujocon 2002, but Sasuga Books kept an eye on him until we returned.