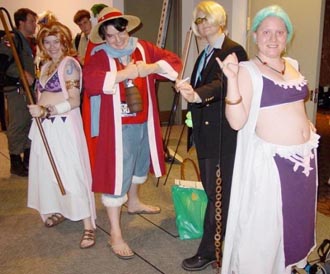
Characters: Nami (left), Monkey D. Luffy (middle left), Sanji/"Mr. Prince" (middle right--created and worn by Shiru), and Neferteri Vivi (right), in Alabaster/Alabasta/Arabasta arc costumes
Series: One Piece
Made for: Otakon 2003
Worn at: Otakon 2003
Photo credits: the group photo and the Nami photo (gleaned from the group photo) are used with permission of icosplay.com.
Construction details (general): Not long after the Shoujocon where we premiered the original Luffy and Zoro costumes, Matt took to wearing the Luffy hat on a more-or-less constant basis. Unfortunately, faced with New England winters, he needed warmer clothing options--thus he made the scarf that Luffy wears during the Alabaster arc to hold down his hat. He added the coat from the same arc for Anime Boston 2003.
As for the other costumes, not long after meeting Jai, I discovered that we shared a mutual love of One Piece. She expressed interest in doing these "alternate" costumes, the dancing girl costumes that Nami and Vivi wear in Nanohana and beyond. Our past cosplay groups being so successful, we could only oblige. We premiered the entire set--Nami, Vivi, and Luffy--at Otakon 2003, and had many adventures trying to navigate downtown Baltimore while, uh, rather scantily clad.
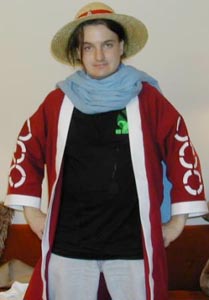
Construction details (Luffy): Really, Luffy's Alabaster costume is simply two additions to his standard costume--thus, the illustration at right, which emphasizes those aspects alone.
Scarf: This was created according to the FY method of sash construction, using a light blue cotton fabric.
Coat: We used (with modifications) the same bathrobe pattern as was used for the Buggy costume. It was made from a slightly stretchy red fabric, which (much to our chagrin) bleeds like a stuck pig when washed. Despite a great deal of pre-treatment of the fabric, on its first post-creation wash, the red fabric bled onto the white applique, giving it a pink tinge. As a result, this coat will need to be recreated at some point.
The white applique, by the way, is according to our simplified method of applique, which works only for simple shapes. In this method, an applique shape is created by first outlining the shape on two pieces of fabric with right sides together. We then machine sew around the outline and clip close to the seam, and then the piece is turned inside out (in the manner of making a pillow) and machine-sewn down to the base fabric. Although not as precise or as neat as standard applique, it does give a nice, raised design, and tends to be much easier to apply and much less time consuming.
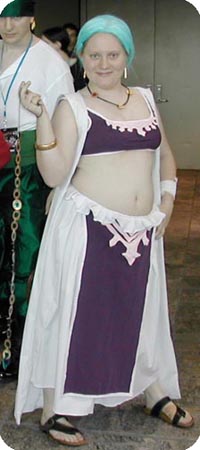
Construction details (Nami): Nami's costume is deceptively simple. In addition to the ooodles of jewelry (which took much more time than we allotted), one of the bigger challenges was getting the waistline of the skirt to lay properly. Once again, cosplay attempts to outwit physics. You tell us how we did.
Bustier: By now, we were very biased towards making patterns ourselves, so the Nami bustier pattern was constructed by taking apart a fitted sports bra and turning the sections into pattern pieces. Even despite this method, a mockup and several fittings were required to get this bustier to maximum tightness and maximum cleavage-showing with minimum chance of, uh, "spillage." The dip in the front, for example, was acquired by using a small piece of elastic to pull the top and bottom edges of the fabric together. The bustier itself was constructed from the purple version of the same fabric used for the Luffy coat--better pre- and post- treatment are and were required here to keep this garment from bleeding color, as well.
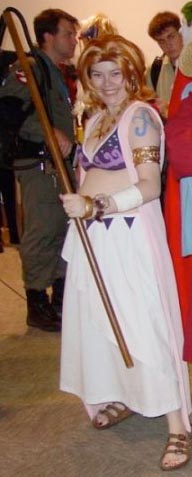
Most of the fitting problems with this garment cropped up after the main shape of the bustier was fitted--for example, fitting the white bias tape trim to the bustier led to more fitting issues, as it made the edges less stretchy. This required some letting out, as a result. Adding on the applique of the purple wave design (in the same fashion as the applique on Luffy's coat) also took away some stretchiness. Still, an optimal level of fit was finally reached, and the bustier was finished with the blue dots added in with puffy fabric paint.
Vest: Matt and I were very taken by some silk crepe de chine that we saw in Fabric Place, and thus, despite the prohibitive cost, we acquired this lovely material for Nami's vest.
The vest was constructed in two matching layers to give optimum thickness and drape. The pattern was modified from the ever-present bathrobe pattern that formed the Luffy and the Buggy costumes, minus arms, of course. The two layers were joined by HOURS of slipstich at the armscye and the bottom hem. Later, it was revealed that the shoulders were too wide for the vest in the anime, so we folded under and sewed down the outside shoulder edge to make it a more accurate representation. They still don't please me quite so much--the shoulder straps are wide enough that they often conceal Nami's tattoo.
Skirt: The basic skirt was simple enough that it was made by measuring and draping the fabric--a blue/white blend with a slight stretch to it, which was also used for Vivi's vest. Like the bustier, the pleating took quite a bit of effort to get just so--we needed pleats in the right places, but we still needed the thing to fit! Although it's hard to see in this picture, the skirt itself has three layers--the base, with the sun-ray pleating; a "half-skirt" layer (short on one side, long on the other) with those same sun-ray pleats; and the row/belt at the top, with is simply triangles of the skirt fabric with triangles of the bustier fabric appliqued on top.
As you can imagine, the big challenge was achieving the physics-defying dip in the skirt at the waist. This, we attempted (to the best of our ability) with the most frequently used tools in our repertoire, millinery wire and buckram--to stiffen and shape the top of the skirt. Although this generally works, I often have to readjust the skirt, as the stiffened top of the skirt will often slip out of place.
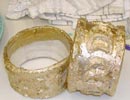
Jewelry/Accessories: Ah, the devil is in the details in this costume. Nami's armbands were made by cutting and shaping a cardboard mailing tube to the size of my upper arm, and using Celluclay to build up the patterns. They were then painted with Liquid Leaf ("classic gold" color), which did an admirable job of making paper goods look like gold. The necklace used shapes formed out of multiple layers of heavy paper glued on top of each other, covered in Liquid Leaf and decorated with fake jewels as necessary, as well as (at the top) some gold-coin beads/baubles from Jo-Ann's, also painted with the same Liquid Leaf. Nami's earrings (not very visible hear) are each constructed of two wooden beads of differing sizes, painted with the Liquid Leaf, and mounted on an earring dangle.
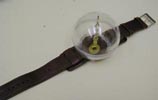
The Rogue Pose (the watch/compass thing on Nami's left wrist) was constructed from a myriad of interesting materials--a cheap watchband from Wal-Mart (sans watch), clock hands from a clock-making kit from Michael's, a plastic sphere neatly bisected with a woodburning tool, and glue (both the hot and super varieties) and wire.
Nami also carries a staff (a long dowel, painted brown) which is a stand-in for the weapon that she normally has at this point in the series, the Clima-Tact--a tri-part, weather-controlling device. Time did not permit to make a properly-shaped Clima-Tact--perhaps later. This is approximately appropriate, in any case, as the Clima-Tact can be formed into a pole-shape, and Nami does wield a staff at earlier parts of the series.
Other details: The wig was ordered from Fun Wigs. I wish I could remember what the name of the wig was, in what color, but unfortunately I don't, and I seem unable to find the wig again on that site. Nami also sports her post-Arlong-arc tattoo, lovingly painted on with blue face paint. She also features the white wrist wrap that is so integral to the Alabaster arc.
Matt had, at one point, constructed a pair of appropriate sandals from vinyl and a sandal sole base, but on our way to Saturday at Otakon, one by one, every strap on the sandal broke! It seems that the seams had weakened the vinyl to the point where they just snapped. I ended up wearing my Birkenstocks instead--an adequate substitute.
More pictures of some of the jewelry. Click for a bigger image:

Construction details (Vivi): Vivi used many of the same fabrics as Nami's costume--not surprising, considering their canon history. The added challenge in making this costume was that we didn't have a live model until Friday of Otakon 2003, when we met Jai in person for the first time. This led to some amusing antics (read: Jai mailing us a bra to use as a pattern).
Bustier: this was made in a similar way to the Nami bustier, using the same fabric--we took a well-fitted bra, took it apart, and constructed a pattern from it. Unfortunately, as we had no live model, we came to realize on the day of the convention that it was too small for Jai, and so we had to cut it down the back and add hooks and eyes to fit it. But, shhhh, you didn't need to know that. Other details: the detail on the bustier was done in the silk crepe de chine of the Nami vest. We had originally planned to sew it down, but seeing how that had caused the Nami bustier to lose elasticity, we decided that it actually looked quite good simply hanging.
Vest: the vest was constructed from the same material as Nami's skirt, and in the same manner as Nami's vest. We selected a fabric that would look blue/white, as it does in the reference materials. Unfortunately, in poor lighting (which is all cons ever have), in large quantities as in this costume, it tends to wash out to pure white, which is not exactly the desired effect.
Skirt: this skirt, thankfully, is a lot less crazy on pleating than the Nami skirt. There are still three layers--a base layer (with minimal pleats), a front "loincloth" in purple with pink details, and a row of ruffles at the top. The base layer was a fairly straightforward skirt, made from draping (interesting, considering we had no one on WHOM TO DRAPE). The loincloth layer was sewn on top of that--it was made from the purple bustier fabric, with edging and details in the pink silk. Again, we intended to sew those details down as well, but it ended up looking so good hanging that we just left it. Making the final ruffle layer was a matter of doing a row of knife pleats on a piece of the skirt and vest fabrics.
Jewelry/Accessories: We constructed the three large beads of Vivi's necklace in the same multiple layers of heavy paper method as we used on Nami's beads (with the same Liquid Leaf gold paint), with a fake jewel glued in the center of each one. The long, green beads that connect each piece are actually made from the plastic covering to CAT-5 cable, painted green with acrylic paint. The bracelet is a cheap wooden bracelet, painted gold with the Liquid Leaf product. The earrings are actually borrowed from the Zoro costume.
The "peacock feathers" (our own name for Vivi's dangly weapon) were made from circular cuts of tin, painted gold with Liquid Leaf, and detailed with a blue/green stained-glass effect paint. When dry (THAT took a while), each one was attached to the previous with thin wire, and then they were mounted on a cord.
Other details: the wig was ordered from Fun Wigs, although I'm not certain I would recommend it--this one was not up to their usual quality. I made the additional mistake of trying to style it, which just made it additionally ugly. The fact that we really didn't take enough time putting it on Jai's head didn't help, either. For lack of a good pair of shoes, Jai simply wore her own sandals. She, too, sports the wrist wrap so important to the Alabaster arc.